Blogroll

photoshop cs6 html 5 css php seo backlinks

adsense

Smarty Template Engine Step by Step Tutorial

Smarty has focused on how to help you make an high-performance, scalability, security and future growth application.

JavaScript was designed to add interactivity to HTML pages

JavaScript’s official name is ECMAScript, which is developed and maintained by the ECMA International organization.

This is default featured slide 3 title

Go to Blogger edit html and find these sentences.Now replace these sentences with your own descriptions.

This is default featured slide 4 title

Go to Blogger edit html and find these sentences.Now replace these sentences with your own descriptions.

This is default featured slide 5 title

Go to Blogger edit html and find these sentences.Now replace these sentences with your own descriptions.

Saturday, 8 February 2014

Create databases and tables free tutorial

In the previous lesson we looked at how to create a connection to a database server. Next step is to create databases and tables.
We'll look at two ways to create databases and tables. First, how it is done in PHP, and then how it's made with the more user-friendly tool PhpMyAdmin, which is standard on most web hosts and in XAMPP.
If you have a hosted website with PHP and MySQL, a database has probably been created for you already and you can just skip this part of the lesson and start creating tables. Again, you should consult your host's support pages for more information.

Create a database and tables with PHP

The function documentationmysql_query are used to send a query to a MySQL database. The queries are written in the language Structured QueryLanguage (SQL). SQL is the most widely used language for database queries - not only for MySQL databases - and is very logical and easy to learn. In this lesson and the next, you will learn the most important SQL queries.
When creating a database, the SQL query documentationCREATE DATABASE is used with the following syntax:
 CREATE DATABASE database name
 
Logical and easy, right!? Let's try to put it into a PHP script:
 mysql_connect("mysql.myhost.com", "user", "sesame") or die(mysql_error());

 mysql_query("CREATE DATABASE mydatabase") or die(mysql_error());

 mysql_close();

 
First, we connect to the MySQL server. Next, we create a database named "mydatabase". And finally, we close the connection to the MySQL server again.
So far so good... but things become a little bit more complicated when we want create tables in PHP. When creating tables, we use the SQL query documentationCREATE TABLE with the following syntax:
 
 CREATE TABLE table name
 (
 column1_name DATA_TYPE,
 column2_name DATA_TYPE,
 column3_name DATA_TYPE,
 ...
 )

 
table_name and column_name are of course the name of the table and the columns, respectively. DATA_TYPE are used to specify the data type to be inserted into the column. The most commonly used data types are:
documentationINT
For numbers without decimals
documentationDECIMAL
For numbers with decimals
documentationCHAR
Short text up to 255 characters
documentationTEXT
For plain text up to 65,535 characters
documentationLONGTEXT
For long passages of text up to 4,294,967,295 characters
documentationDate
For dates in the format YYYY-MM-DD
documentationTime
For time in the format HH:MM:SS
documentationDATETIME
For date and time in the format YYYY-MM-DD HH:MM:SS
All in all, logical and relatively easy. Let's try to put it into an example:
 
 mysql_connect("mysql.myhost.com", "user", "sesame") or die(mysql_error());
 mysql_select_db("people") or die(mysql_error());

 mysql_query("CREATE TABLE MyTable (
   id INT AUTO_INCREMENT,
   FirstName CHAR,
   LastName CHAR,
   Phone INT,
   BirthDate DATE
   PRIMARY KEY(id)
 )") Or die(mysql_error());
 mysql_close ();

 
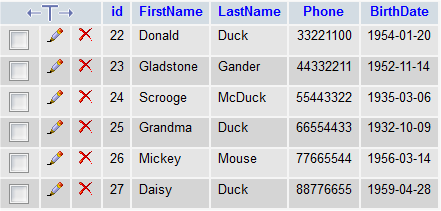
In the example, we start by connecting to the MySQL server. Next we use the function documentationmysql_select_db to select the database "people". Then we create the table "persons" with 5 columns.
Note that at the "id" column, we first use documentationINT to specify that the column contains numbers and then add documentationAUTO_INCREMENT to automatically increase the number and ensure a unique ID for each row.
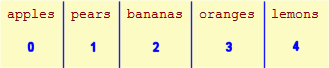
At the end, we use documentationPRIMARY KEY to set the "id" column as the primary key. The primary key uniquely identifies each record (/row) in the table, which becomes very useful later when we update the database.

Create database and tables with phpMyAdmin

It can be useful to be able to create databases and tables directly in PHP. But often, it will be easier to use phpMyAdmin (or any other MySQL administration tool), which is standard on most web hosts and XAMPP. The screendumps below shows how to create a database and tables in phpMyAdmin.
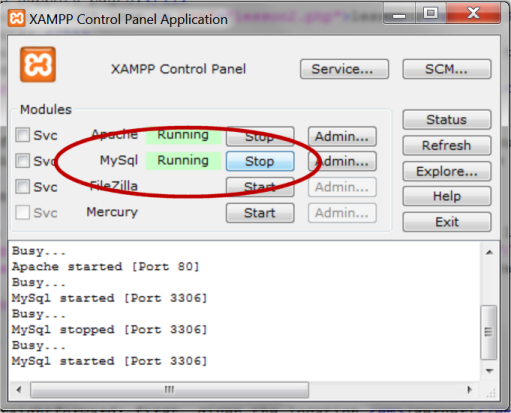
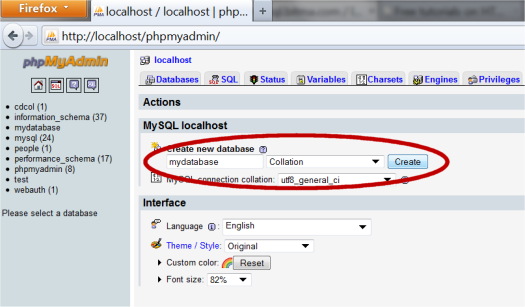
Start by logging onto phpMyAdmin. Often, the address will be the same as your MySQL server (eg. "http://mysql.myhost.com") and with the same username and password. In XAMPP, the address is http://localhost/phpmyadmin/.
When you are logged on, simply type a name for the database and press the button "Create":
phpMyAdmin
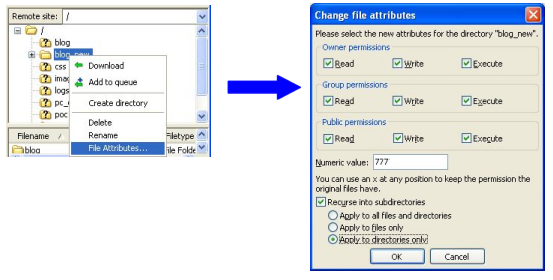
At some hosts, it's possible the have already created a database, and you may not have the rights to create more. If that is the case, you obviously just use the assigned database.
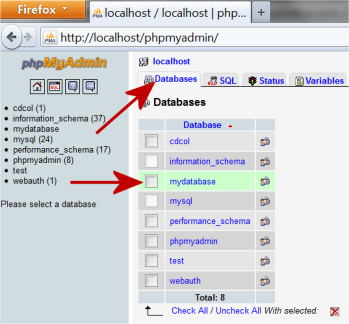
To create a table, click on the tab "Databases" and choose a database by clicking on it:
phpMyAdmin
Then there will be a box titled "Create new table in database", where you type the name of the table and the number of columns and press the button "Go":
phpMyAdmin
Then you can name the columns and set the data type, etc., as in the SQL example above.
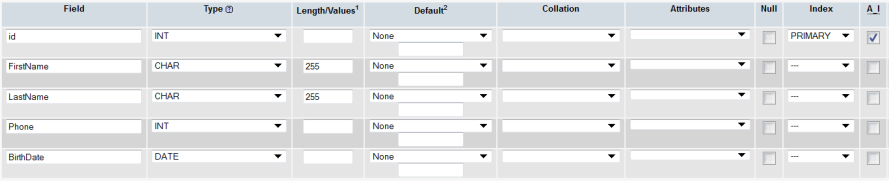
phpMyAdmin
Notice, that here we also set "id" as documentationPRIMARY KEY and uses documentationAUTO_INCREMENT (A_I).

Connection to database server free tutorial

A database is a collection of information / data that is organized so that it can easily be retrieved, administrated and updated. Databases thereby enable the opportunity to create dynamic websites with large amounts of information. For example, all data on members of HTML.net and all posts in the forums are stored in databases.
A database usually consists of one or more tables. If you are used to working with spreadsheets, or maybe have used databases before, tables will look familiar to you with columns and rows:
Table
There are many different databases: MySQL, MS Access, MS SQL Server, Oracle SQL Server and many others. In this tutorial, we will use the MySQL database. MySQL is the natural place to start when you want to use databases in PHP.
You need to have access to MySQL in order to go through this lesson and the next lessons:
  • If you have a hosted website with PHP, MySQL is probably already installed on the server. Read more at your web host's support pages.
  • If you have installed PHP on your computer yourself and have the courage to install MySQL as well, it can be downloaded in a free version (MySQL Community Edition) at the MySQL's website.
  • If you use XAMPP MySQL is already installed and ready to use on your computer. Just make sure MySQL is running in the Control Panel:

    XAMPP
In the rest of this lesson, we will look more closely at how you connect to your database server, before we learn to create databases and retrieve and update data in the following sessions.

Connection to database server

First, you need to have access to the server where your MySQL database is located. This is done with the function documentationmysql_connect with the following syntax:
 mysql_connect(server, username, password) 
 
Pretty straightforward: First, you write the location of the database (server), and then type in the username and password.
If you have your own website, you should read about location of your MySQL server on your host's support pages. Username and password will often be the same as those you use for FTP access. Otherwise contact your provider.
Example of a MySQL connection on a hosted website:
 mysql_connect("mysql.myhost.com", "user001", "sesame") or die(mysql_error()); 
 
Example of a MySQL connection with XAMPP (default settings):
 mysql_connect("localhost", "root", "") or die (mysql_error());
 
In the examples are added or die(mysql_error()) which, in brief, interrupts the script and writes the error if the connection fails.
Now we have made a connection to a MySQL server, and can now start creating databases and retrieve and insert data. This is exactly what we will look at in the next lessons.
By the way, keep in mind that it is good practice to close the database connection again when you're finished retrieving or updating data. This is done with the function documentationmysql_close.

Php Writing to a text file free tutorial

In the previous lesson, we learned to read from a text file. In this lesson, we will learn to write to a text file.
The two methods are very similar, but there is one very important difference: You must have write permissions to the file. This means that the file will have to be located in a folder where you have the necessary permissions.
If you work locally on your own computer, you can set the permissions yourself: right-click on the folder and choose "Properties". With most web hosts, you will normally have one folder with write permissions. It's often called something like "cgi-bin", "log", "databases" or something similar. If your web host permits it, you might also be able to set permissions yourself. Usually you can simply right-click on a folder in your FTP client and choose "properties" or "permissions" or something similar. The screendumps below shows how it's done in FileZilla.
FileZilla
Read more on your web host's support pages.
Note that it is the text file that needs to be in the folder with write permissions - not the PHP file.

Open the text file for writing

In the same way as when reading from a text file, the documentationfopen function is used for writing, but this time we set the mode to "w" (writing) or "a" (appending).
The difference between writing and appending is where the 'cursor' is located - either at the beginning or at the end of the text file.
The examples in this lesson use an empty text file called textfile.txt. But you can also create your own text file if you like.
First, let us try to open the text file for writing:
 <?php

 // Open the text file
 $f = fopen("textfile.txt", "w");

 // Close the text file
 fclose($f);

 ?>


Example 1: Write a line to the text file

To write a line, we must use the function documentationfwrite, like this:
 <html>

 <head>
 <title>Writing to a text file</title>
 </head>
 <body>

 <?php

 // Open the text file
 $f = fopen("textfile.txt", "w");

 // Write text line
 fwrite($f, "PHP is fun!"); 

 // Close the text file
 fclose($f);

 // Open file for reading, and read the line
 $f = fopen("textfile.txt", "r");
 echo fgets($f); 

 fclose($f);

 ?>

 </body>
 </html>
 
 
Since we opened the file for writing, the line is added at the top, and thus overwrites the existing line. If we instead open the file appending, the line is added at the bottom of the text file, which then will increase by one line each time it's written to.

Example 2: Adding a text block to a text file

Of course, it is also possible to add an entire text block, instead of just a single line, like this:
 <html>
 <head>
 <title>Write to a text file</title>
 </head>
 <body>

 <h1>Adding a text block to a text file:</h1>
 <form action="myfile.php" method='post'>
 <textarea name='textblock'></textarea>
 <input type='submit' value='Add text'>
 </form>

 <?php

 // Open the text file
 $f = fopen("textfile.txt", "w");

 // Write text
 fwrite($f, $_POST["textblock"]); 

 // Close the text file
 fclose($f);

 // Open file for reading, and read the line
 $f = fopen("textfile.txt", "r");

 // Read text
 echo fgets($f); 
 fclose($f);

 ?>
 
 </body>

 </html>


Reading from a text file PHP free tutorial

In the previous lesson, we learned how to use PHP to access the server's filesystem. In this lesson, we will use that information to read from an ordinary text file.
Text files can be extremely useful for storing various kinds of data. They are not quite as flexible as real databases, but text files typically don't require as much memory. Moreover, text files are a plain and simple format that works on most systems.

Open the text file

We use the documentationfopen function to open a text file. The syntax is as follows:
 fopen(filename, mode)
 
 
filename
Name of the file to be opened.
mode
Mode can be set to "r" (reading), "w" (writing) or "a" (appending). In this lesson, we will only read from a file and, therefore, use "r". In the next lesson, we will learn to write and append text to a file.
The examples in this lesson use the text file unitednations.txt. This is a simple list of the Programmes and Funds of the United Nations and their domains. You can either download the file, or you can create your own file and test the examples with it.
First, let's try to open unitednations.txt:
 <?php

 // Open the text file
 $f = fopen("unitednations.txt", "r");

 // Close the text file
 fclose($f);

 ?>


Example 1: Read a line from the text file

With the function documentationfgets, we can read a line from the text file. This method reads until the first line break (but not including the line break).
 <html>

 <head>
 <title>Reading from text files</title>
 </head>
 <body>

 <?php

 $f = fopen("unitednations.txt", "r");

 // Read line from the text file and write the contents to the client
 echo fgets($f); 

 fclose($f);

 ?>

 </body>
 </html>


Example 2: Read all lines from the text file


 <html>

 <head>
 <title>Reading from text files</title>
 </head>
 <body>

 <?php

 $f = fopen("unitednations.txt", "r");

 // Read line by line until end of file
 while(!feof($f)) { 
     echo fgets($f) . "<br />";
 }

 fclose($f);

 ?>

 </body>
 </html>
 
 
In the example, we loop through all the lines and use the function documentationfeof (for end-of-file) to check if you are at the end of the file. If this is not the case ("!" - see lesson 6), the line is written.
Instead of looping through all the lines, we could have achieved the same result with the function fread. If you work with very large text files with thousands of lines, be aware that the fread function uses more resources than the documentationfgets function. For smaller files, it makes very little difference.

Example 3: A simple link directory

As mentioned at the beginning of this lesson, text files can be excellent for data storage. This is illustrated in the next example where we create a simple link directory from the contents of the text file unitednations.txt.
The file is systematically written with the name of the program, then a comma, and then the domain. As you can probably imagine, more information could easily be stored in this comma-separated data file.
To get the information in each line, we use an array.
 <html>
 <head>
 <title>Reading from text files</title>

 </head>
 <body>

 <?php
 $f = fopen("unitednations.txt", "r");

 // Read line by line until end of file
 while (!feof($f)) { 

 // Make an array using comma as delimiter
    $arrM = explode(",",fgets($f)); 

 // Write links (get the data in the array)
    echo "<li><a href='http://" . $arrM[1] . "'>" . $arrM[0]. "</a></li>"; 

 }

 fclose($f);
 ?>

 </body>
 </html>
 
 
Quite handy, right? In principle, you could now just expand the text file with hundreds of links or perhaps expand your directory to also include address information.

Learn Php Filesystem free tutorial

With PHP, you can access the server's filesystem. This allows you to manipulate folders and text files in PHP scripts.
For example, you can use PHP to read or write a text file. Or you can list all files in a specified folder. There are many possibilities and PHP can save you lots of tedious work.
Here, we'll look at how you can use PHP to work with folders and files. The goal is to give you a quick overview. In the next lessons, we will look more closely at the different possibilities. We will not go through all the different possibilities. Again, see the documentation for a complete listing.
documentationfilemtime
Returns the time for which the contents of a file was last edited (as UNIX timestamp - see lesson 4)).
documentationfileatime
Returns the time when a file was last accessed / opened (as a UNIX timestamp - see lesson 4)).
documentationfilesize
Returns the size of a file in bytes.
Let us try to find the three properties of the file you are looking at now: "/tutorials/php/lesson14.php"
 <html>

 <head>
 <title>Filesystem</title>
 </head>
 <body>
  
 <?php
   
 // Find and write properties
 echo "<h1>file: lesson14.php</h1>";
 echo "<p>Was last edited: " . date("r", filemtime("lesson14.php")); 
 echo "<p>Was last opened: " . date("r", fileatime("lesson14.php")); 
 echo "<p>Size: " . filesize("lesson14.php") . " bytes";
 
 ?>

 </body>
 </html>


Folders

PHP also allows you to work with folders on the server. We will not go through all the different possibilities - only show an example. Again, see the documentation for more information.
documentationopendir
Opens a specified folder.
documentationreaddir
Returns the filename of the next file in the open folder (cf. documentationopendir)
documentationclosedir
Closes a specified folder.
The example below lists the contents of the folder "tutorials/php/".
 <html>
 <head>
 <title>FileSystemObject</title>
 </head>
 <body>

 <?php
   
 // Opens the folder
 $folder = opendir("../../tutorials/php/");

 // Loop trough all files in the folder
 while (($entry = readdir($folder)) != "") {
    echo $entry . "<br />";
 }

 // Close folder
 $folder = closedir($folder);

 ?>

 </body>

 </html>
 
 
In the example the directory "../../tutorials/php/" is first opened. Then a loop is used to write the name of the next file in the folder as long as there are more files. At the end, the folder is closed.

What is a cookie? How is information stored in a cookie? How do you retrieve the value of a cookie?

How and what kind of information websites are collecting from their users, and especially how they use it, is a hot topic. Cookies are often mentioned as an example of how information is collected and pose a threat to your privacy. But are there reasons to be worried? Judge for yourself. Once you have gone through this lesson, you will know what can be done with cookies.

What is a cookie?

A cookie is a small text file in which a website can store different information. Cookies are saved on the user's hard drive and not on the server.
Most cookies expire (delete themselves) after a predetermined time period, which can range from one minute to several years. But the user can also identify and delete any cookies on his/her computer.
Most browsers, such as Microsoft Internet Explorer, Mozilla Firefox and Google Chrome, can be configured to let the user choose whether or not he/she will accept a cookie. But then, why not just say no to all cookies? It is possible. But many websites would not work as intended without cookies, since cookies in many contexts are used to improve the usability and functionality of the website.

How is information stored in a cookie?

It's easy to set or modify a cookie in PHP with setcookie. In the first example, we will create a cookie and set the value.
First, you need a name for the cookie. In this example we will use the name "HTMLTest". Next, you set the value of the cookie like this:
 <?php 

 // Setting the cookie
 setcookie("HTMLTest", "This is a test cookie");   

 ?> 

 
By default, a cookie is kept untill the browser is closed, but it can easily be modified by adding another parameter setting the expiry time:
 <?php 

 // Setting the cookie
 setcookie("Name", "C. Wing, time()+3600);   
 setcookie("Interests", "plane spotting", time()+3600); 
 
 ?>
 
 
"Time()+3600" specified that the cookie should expire in 3600 seconds (60 minutes) from now.
In the example above, we stored information about a user's name and interests. This information can, for example, be useful to target the website specifically for the individual visitor.

How do you retrieve the value of a cookie?

To get the value of the cookie, documentation$_COOKIE is used. For example, if we need the information from the example above, we do it like this:
 <?php 

 // Retrieve values from the cookie
 $strName = $_COOKIE["Name"];   
 $strInterest = $_COOKIE["Interest"];
  
 // Write to the client
 echo "<p>" . strName . "</p>"   
 echo "<p>Your interest is . " strInterest . "</p>"
 
 ?>


Who can read the cookie?

By default, a cookie can be read at the same second-level domain (e.g. html.net) as it was created. But by using the parameters domain and path, you can put further restrictions on the cookie using the following syntax:
 
 setcookie(name, value, expiration time, path, domain);
 
 
Let us look at an example:
 
 <?php
 
 // Setting the cookie: name, value, expiration time, path, domain
 setcookie("Name", "C. Wing", time()+60*60*24*365, "/tutorials/php/", "www.html.net");   
 ?>
 
 
In the example above, we set a cookie called "Name" with the value "C. Wing." The cookie expires after one year (60 seconds * 60 minutes * 24 hours * 365 days) and can be read only by sites located in the directory "/tutorials/php/" on the (sub-)domain "www.html.net".

Example of a cookie

We can try to save a sample cookie on your computer and then see how it looks.
The following code sets the cookie:
 <?php 

 // Setting the cookie
 setcookie("HTMLTest", "This text is in a cookie!", time()+60*60*24, "/tutorials/php/", "www.html.net");   
  
 // Write the information to the client
 echo $_COOKIE ["HTMLTest"];    

 ?>
 
 
The cookie is being placed on your hard drive. Depending on what operating system you use, your cookies may be saved in different places. Once you find them, they will probably look like this:
From Windows Explorer - folder Cookies
As you can see, a cookie is a normal text file that can be open with Notepad, for example. The contents of the cookie we have just created will probably look something like this:
 HTMLTest TEXT=This+text+is+in+a+cookie% 21 www.html.net/tutorials/php 0 80973619229399148 4216577264 29399141 * 
 
 
We will not go into detail with the different codes, but simply note that the user has full control over cookies on his/her computer.
In this lesson, we have looked at what cookies can do but not what they can be used for. It's a common concern that some sites use cookies for inappropriate activities. But in most cases, cookies are used to make sites more user-friendly or relevant for the individual users.

Learn Php Sessions with example?

When you visit a website, you do a number of different things. You click from one page to another. Perhaps you also fill out a form or purchase a product.
As a web developer, such information is of great importance to developing successful web solutions.
Suppose, for example, that you want to make a site where some pages are protected with login and password. To make this protection effective, the password-protected pages should have access to information on whether the user has logged in at an earlier time. You must, in other words, be able to "remember" what the user did earlier.
This is exactly what this lesson is about - how you can use sessions in PHP to store and retrieve information during a user's visit to your site.

Session

PHP session allows you to manage information about a user's session. You can write smart applications that can identify and gather information about users.
A session can begin in different ways. We will not go into technical details here but focus on the case where a session starts by a value being stored. A session ends/dies if the user hasn't requested any pages within in a certain timeframe (by the standard 20 minutes). Of course, you can also always end/kill a session in your script.
Let us say that 50 people are clicking around on the same site, e.g. a web shop, at the same time. Information on what each of them have in their shopping cart would best be stored in a session. In order to identify the individual users, the server uses a unique user ID that is stored in a cookie. A cookie is a small text file stored on the user's computer. Therefore, sessions often require support of cookies in the user's browser.

An example of using sessions

When you requested this page, I stored the current time in a session. I did this so that I can now show you an example of how a session works.
I named the item "StartTime" and stored it by adding the following line in my PHP script:
 <?php

 session_start();
 $_SESSION["StartTime"] = date("r");

 ?>
 
 
Thereby, a session was started. As described above, each session is given an ID by the server.
Your session has the following ID: kq1hbal12le864jtbqos6bair5
At any time, I can call the "StartTime" from the session by writing:
 <?php

 session_start();
 echo $_SESSION["StartTime"];

 ?>
 
 
Which would reveal that the page was requested at Sat, 08 Feb 2014 14:53:32 +0100 (according to the clock on this web server).
But what is interesting is that the information remains in the session, even after you have left this page. The information will follow you until your session ends.
By default, a session lasts till the user closes the browser, then it dies automatically. But if you want to stop a session, it can always be killed in this way:
 <?php

 session_destroy();

 ?>
 
 
Let us try to look at another example where sessions are used: a password solution.

Login system with sessions

In the following example, we will make a very simple login system. We will use many of the things we have learned in previous lessons.
The first thing we need is a form where people can enter their username and password. It could look like this:
 <html>
 <head>
 <title>Login</title>

 </head>
 <body>
 <form method="post" action="login.php">

 <p>Username: <input type="text" name="username" /></p>
 <p>Password: <input type="text" name="password" /></p>

 <p><input type="submit" value="Let me in" /></p>

 </form>
 </body>
 </html>


Then we create the file: login.php.
In this file, we check whether it is the correct username and password that has been entered. If that is the case, we set a session that says that this user is logged in with the correct username and password.
 <html>

 <head>
 <title>Login</title>

 </head>
 <body>
 
 <?php

 // Check if username and password are correct
 if ($_POST["username"] == "php" && $_POST["password"] == "php") {
  
 // If correct, we set the session to YES
   session_start();
   $_SESSION["Login"] = "YES";
   echo "<h1>You are now logged correctly in</h1>";
   echo "<p><a href='document.php'>Link to protected file</a><p/>";
  
 }
 else {
  
 // If not correct, we set the session to NO
   session_start();
   $_SESSION["Login"] = "NO";
   echo "<h1>You are NOT logged correctly in </h1>";
   echo "<p><a href='document.php'>Link to protected file</a></p>";
  
 }

 ?>

 </body>
 </html>


In the protected files, we want to check whether the user is logged in properly. If this is not the case, the user is sent back to the login form. This is how the protection is made:
 <?php

 // Start up your PHP Session 
 session_start();

 // If the user is not logged in send him/her to the login form
 if ($_SESSION["Login"] != "YES") {
   header("Location: form.php");
 }

 ?>

 <html>
 <head>
 <title>Login</title>
 </head>

 <body>
 <h1>This document is protected</h1>

 <p>You can only see it if you are logged in.</p>
 </body>
 </html>
 

Php Passing variables in a URL. How does it work?

When you work with PHP, you often need to pass variables from one page to another. This lesson is about passing variables in a URL.

How does it work?

Maybe you have wondered why some URLs look something like this:
 http://html.net/page.php?id=1254
 
 
Why is there a question mark after the page name?
The answer is that the characters after the question mark are an HTTP query string. An HTTP query string can contain both variables and their values. In the example above, the HTTP query string contains a variable named "id", with the value "1254".
Here is another example:
 http://html.net/page.php?name=Joe
 
 
Again, you have a variable ("name") with a value ("Joe").

How to get the variable with PHP?

Let's say you have a PHP page named people.php. Now you can call this page using the following URL:
 people.php?name=Joe
 
 
With PHP, you will be able to get the value of the variable 'name' like this:
 $_GET["name"]
 
 
So, you use documentation$_GET to find the value of a named variable. Let's try it in an example:
 <html>
 <head>
 <title>Query string</title>
 </head>
 <body>

 <?php

 // The value of the variable name is found
 echo "<h1>Hello " . $_GET["name"] . "</h1>";

 ?>

 </body>
 </html>
 
 
When you look at the example above, try to replace the name "Joe" with your own name in the URL and then call the document again! Quite nice, eh?

Several variables in the same URL

You are not limited to pass only one variable in a URL. By separating the variables with &, multiple variables can be passed:
 people.php?name=Joe&age=24
 
 
This URL contains two variables: name and age. In the same way as above, you can get the variables like this:
 $_GET["name"]
 $_GET["age"]
 
 
Let's add the extra variable to the example:
 <html>
 <head>
 <title>Query string </title>
 </head>
 <body>

 <?php

 // The value of the variable name is found
 echo "<h1>Hello " . $_GET["name"] . "</h1>";
  
 // The value of the variable age is found
 echo "<h1>You are " . $_GET["age"] . " years old </h1>";

 ?>

 </body>
 </html>


PHP function? What is a function?

In previous lessons you have learned to use functions like documentationdate() and documentationarray(). In this lesson, you will learn to create your own functions using documentationfunction.

What is a function?

A function process inputs and returns an output. It can be useful if, for example, you have a wide range of data you have processed or if you have calculations or routines that must be performed many times.
A function has the following syntax:
 Function Name(list of parameters) {
    Statement
 }
 
 
This way, we can make a very simple function that can add the value 1 to a number. It could look like this:
 function AddOne($x) {
    $x = $x + 1;
    echo $x;
 }


Our function is named AddOne and must be called with a number - e.g. 34....
 echo AddOne(34);
 
 
... which (surprise!) will return 35.
The example above processes a number, but functions can work with text, dates or anything else. You can also create functions that are called by many different parameters. In this lesson you will see different examples of functions.

Example 1: Function with more parameters

As mentioned above, you can easily create a function that can be called with more parameters. In the next example, we'll create a function that is called with three numbers and then returns the value of the three numbers added together:
 <html>
 <head>
 <title>Functions</title>

 </head>
 <body>

 <?php

 function AddAll($number1,$number2,$number3) {
    $plus = $number1 + $number2 + $number3;
    return $plus;
 }
  
 echo "123 + 654 + 9 equals " . AddAll(123,654,9);

 ?>

 </body>
 </html>
 
 
Ok. Now that was almost too simple! But the point was just to show you that a function can be called with more parameters.

Example 2: English date and time

Let us try to make a slightly more complex function. A function that's called with a date and time returns it in the format: Wednesday, 15 February, 2012, 10:00:00 AM
 <html>
 <head>
 <title>Functions</title>
 </head>
 <body>

 <?php

 function EnglishDateTime($date) {
  
   // Array with the English names of the days of the week
   $arrDay = array("Monday","Tuesday","Wednesday","Thursday","Friday","Saturday","Sunday");
  
   // Array with the English names of the months
   $arrMonth = array("","January","February","March","April","May","June","July","August","September","October","November","December");
  
   // The date is constructed
   $EnglishDateTime = $arrDay[(date("w",$date))] . ", " . date("d",$date);
   $EnglishDateTime = $EnglishDateTime  . " " . $arrMonth[date("n",$date)] . " " . date("Y",$date);
   $EnglishDateTime = $EnglishDateTime  . ", " . date("H",$date) . ":" . date("i",$date);
  
   return $EnglishDateTime;

 }
  
 // Test function
 echo EnglishDateTime(time());

 ?>

 </body>
 </html>
 
 
Please note how '$arrMonth' and '$EnglishDateTime' are constructed over several lines. This is done so that users with a low screen resolution can better see the example. The method has no effect on the code itself.
The function above works on all web servers regardless of language. This means that you can use such a function if your website, for example, is hosted on a French server, but you want English dates.

PHP Arrays? What is an array? How do you use an array?

In this lesson, we will look at what an array is, how it is used, and what it can do.
Understanding arrays can be a little difficult in the beginning. But give it a try anyway... we've tried to make it as easy as possible.

What is an array?

An array is a set of indexed elements where each has its own, unique identification number.
Sound confusing? It's actually not that complicated.
Imagine a list of words separated by commas. It is called a comma-separated list, and it could, for example, look like this:
 apples, pears, bananas, oranges, lemons
 
 
Then try to imagine dividing the list at each comma. Next, give each section a unique identification number like this:
apples (0), pears (1), bananas (2), oranges (3), lemons (4)
What you see is an array. We can, for example, name the array "fruits". The idea is that we can access the array with a number and get a value back, like this:
fruits(0) = apples
fruits(1) = pears
fruits(2) = bananas
fruits(3) = oranges
fruits(4) = lemons
This is the idea behind arrays. Let us try to use it in practice.

How do you use an array?

We will continue with the fruit example. Step by step, we will make it work as a real array. First, we set a variable equal to the list of fruits:
 <?php

 $fruitlist = "apples, pears, bananas, oranges, lemons";
 
 ?>
 
 
Next, we use the function documentationexplode to split the list at each comma:
 <?php
  
 $fruitlist = "apples, pears, bananas, oranges, lemons";
  
 $arrFruits = explode(",", $fruitlist);

 ?>
 
 
Voila! "$arrFruits" is now an array!
Notice that we called the function documentationexplode with two arguments:
  1. the list that should be split
  2. and the delimiter - i.e., the character used to split (in this case a comma) - in quotation marks: ",".
Here we use a comma as a delimiter, but you can use any character or word as a delimiter.
Let us try to comment the script and put it into a PHP page:
 <html>
 <head>
 <title>Array</title>
 </head>
 <body>

 <?php
 
 // Comma separated list
 $fruitlist = "apples, pears, bananas, oranges, lemons";
  
 // Create an array by splitting the list (with comma as delimiter)
 $arrFruits = explode(",", $fruitlist);
  
    // Write the values from our array
    echo "<p>The list of fruits:</p>";
  
    echo "<ul>";
    echo "<li>" . $arrFruits[0] . "</li>";
    echo "<li>" . $arrFruits[1] . "</li>";
    echo "<li>" . $arrFruits[2] . "</li>";
    echo "<li>" . $arrFruits[3] . "</li>";
    echo "<li>" . $arrFruits[4] . "</li>";
    echo "</ul>";

 ?>

 </body>
 </html>


Loop through an array

Back in lesson 5 you learned about loops. Now we will look at how you can loop through an array.
When you know how many elements an array contains, it is not a problem defining the loop. You simply start with 0 and let the loop continue to the number of items available. In the example with the fruits, you would loop through the array like this:
 <html>
 <head>
 <title>Array</title>

 </head>
 <body>

 <?php
 
 // Comma separated list
 $fruitlist = "apples, pears, bananas, oranges, lemons";
  
 // Create an array by splitting the list (with a comma as delimiter)
 $arrFruits = explode (",", $fruitlist);
  
    echo "<p>The list of fruits:</p>";
    echo "<ul>";
  
    // Loop through the array $arrFruits
    for ($x=0; $x<=4; $x++) {
       echo "<li>" . $arrFruits[$x] . "</li>";
    }
  
    echo "</ul>";

 ?>
  
 </body>
 </html>
 
 
As you can see, the variable $x (which increases from 0 to 4 in the loop) was used to call the array.

How to find the size of an array

But what if we add another fruit to the list? Then our array will contain one element more - which will get the identification number 5. Do you see the problem? Then we need to change the loop, so it runs from 0 to 5, or else not all of the elements will be included.
Wouldn't it be nice if we automatically could find out how many elements an array contains?
That's exactly what we can do with the function documentationforeach. Now we can make a loop that works regardless of the number of elements:
 <?php
    foreach ($arrFruits as $x) {
       echo $x;
    }
 ?>
 
 
This loop will work regardless of how many or few elements the array contains.

Another example

Below is another example of how you can use an array to write the name of the month:
 <html>
 <head>
 <title>Array</title>

 </head>
 <body>
 
 <?php
 // Creates array with each month.
 // Creates array with the months. Note the comma before January - because there is no month with the number 0
 $arrMonths = array("","January","February","March","April","May","June","July","August","September","October","November","December");
  
 // Call the array with the number of the month - write to the client
 echo $arrMonths[date("n")];
 ?>

 </body>
 </html>
 
 
Notice that we use the function documentationarray instead of the function documentationexplode to create an array.